Create a scene mod
Here is a step by step tutorial for making a scene mod.
Phase 1: Define your mod#
1. New mod project#
Make sure you have the prerequirements for modding and download a fresh ModToolkit to start.
- Download & Install Unity Hub.
- Download & Install Unity (2020.3.48f).
- Download the Battle Talent ModToolkit. (Wanna use git? Check out the repo!)
- Open the downloaded ModToolkit in Unity.
2. Remove unused content#
Make sure to remove the demo content so that we have a clean project to start with.
- In the Unity toolbar; click
Tools > Destructive > Cleanup All Content.
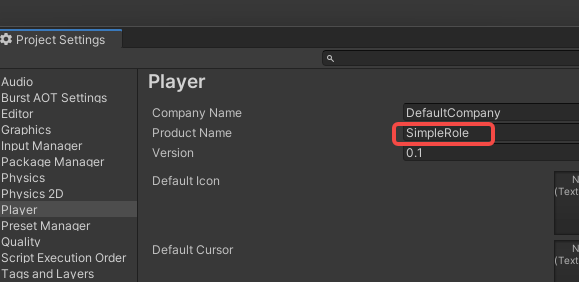
3. Product name#
Change the product name so that the mod folder name will not conflict with other mods.
- In the Unity Toolbar: Go to
Edit -> Project Settings -> Player. - Modify field
Product Nameto your new mod name. Use the format:YOURPREFIX_MyModName. Example:WMD_ChevalierWeapons
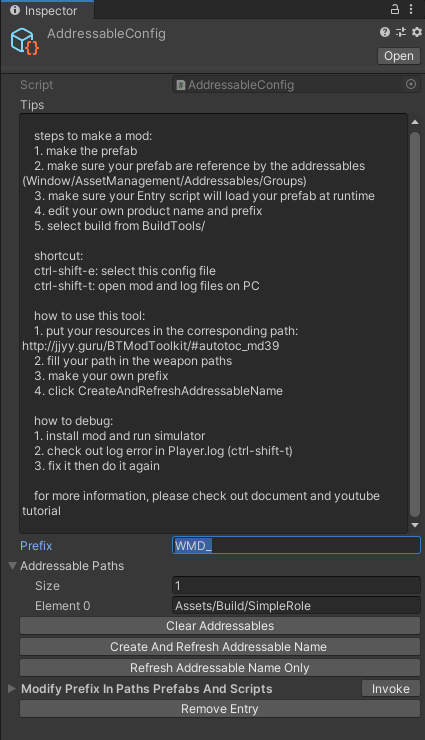
4. Prefix.#
Change the project prefix so that the mod files will not conflict with other mods.
In the Unity file browser: Open
Assets -> Resources -> AddressableConfig.assetModify field
Prefixto your new prefix name. Use the format:YOURPREFIX_MyModName_. Example:WMD_ChevalierWeapons_Note: The prefix used in the tutorial is
WMD_. You will need to fill in your new prefix instead of everyWMD_in the tutorial.
5. Generate folder structure using the template wizard.#
- In the Unity Toolbar: Go to
Tools -> Template Wizard. - Make sure the
inspectorwindow is shown (Template Wizard will show there). - Enter a
new mod folder name. Example:YourModName - Set the
Mod Typeto:Scene. - Fill in the desired
ItemInfoConfigfields. - Click the
Generate Templatebutton to generate theScenefolder structure.
6. Place items in the scene#
- Open the newly created
scenefile in theScenefolder. (for example:Build > YourNewModFolder > Scene) - Add collision to the items by adding
MeshCollider. - Make sure to change the layer of the objects to:
CharacterObstacleor else they will not collide with the player.
Extra: There are a couple of prefabs you can use the place special interactable objects.
| Prefab | Description |
|---|---|
HookRoot | Allows you to add a root that you can swing across gaps. |
SlideWall | Allows you to add a wall object that you can run along. |
StoneGate | A togglable gate. |
SkeletonStatue | A grabbable statue that can start waves. |
WeaponPendant | A grabbable weapon that will float in a location until grabbed. |
RespawnTrigger | A collider that will set the respawn point to the center of the collider when a player enters it. |
7. CharacterPos#
- Adjust the
CharacterPos(underSceneScriptNode) to adjust the character spawning position.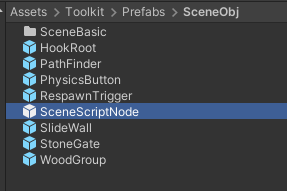
8. DeadZone#
- Adjust the
Transform'sYvalue to change the position of the DeadZone (underSceneScriptNode). - Place RespawnTrigger's to place respawn points.
9. PathFinder#
- Adjust
BoxColliderof thePathFinder(underSceneScriptNode) to enclose the whole scene.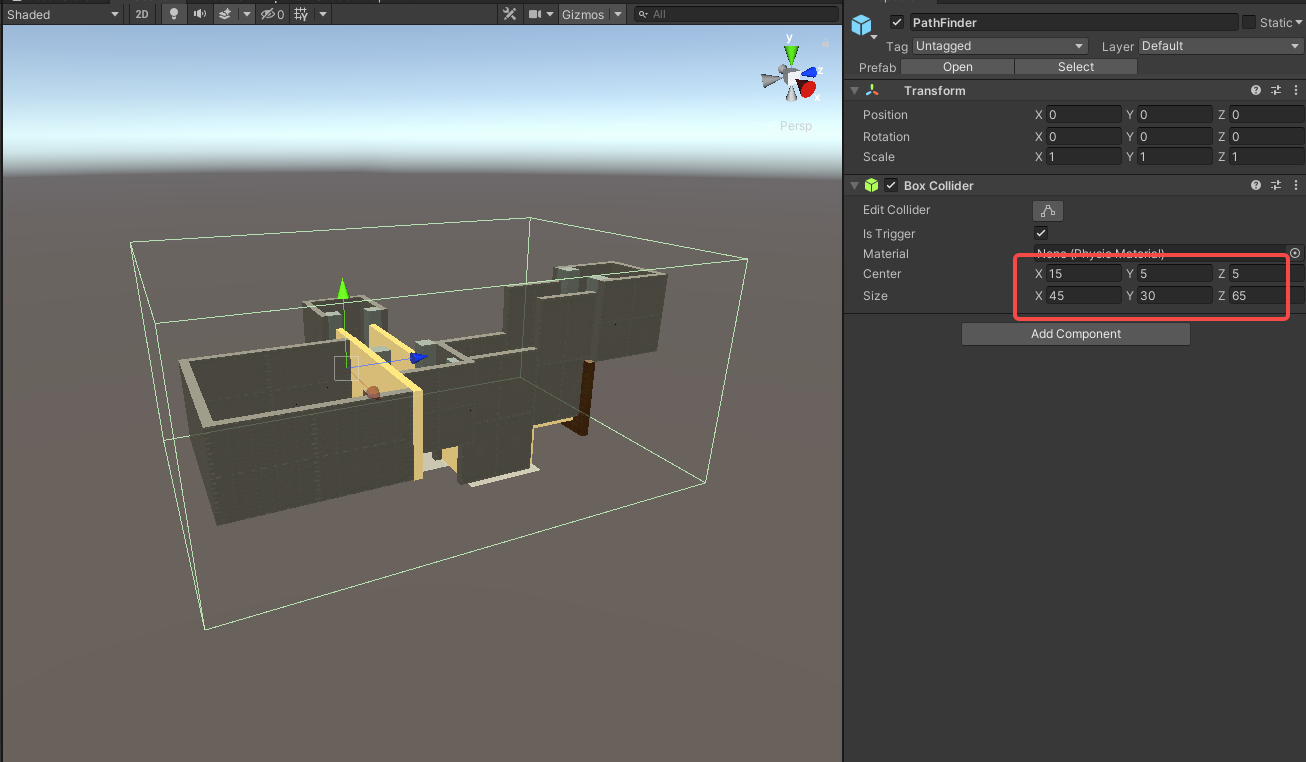
- Save the scene.
7. Bake the scene#
This step is not required, but it will increase performance, because it will not render objects that are currently not visible for the player.
Mark all objects that do not move
Occluder Static.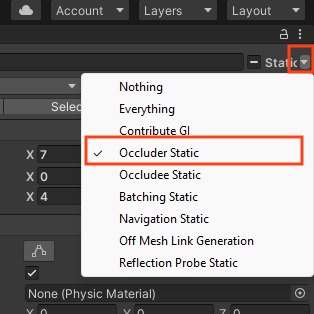
Open the
Occlusionwindow by going toWindow > Rendering > Occlusion Culling.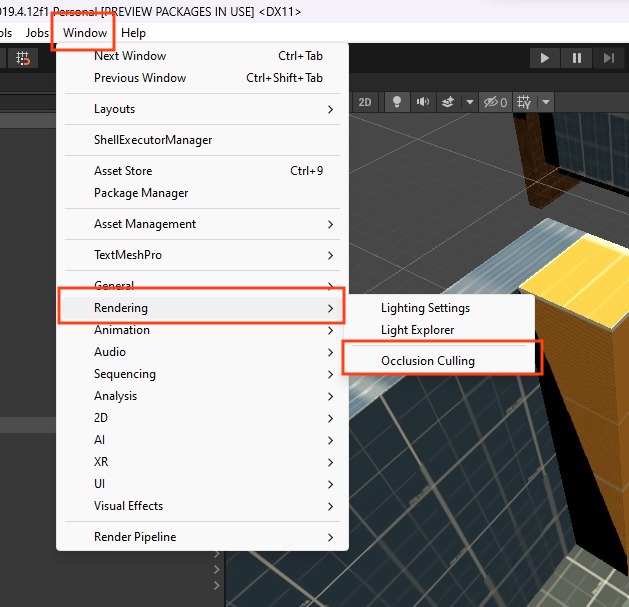
In the
Occlusionwindow, click theBakebutton.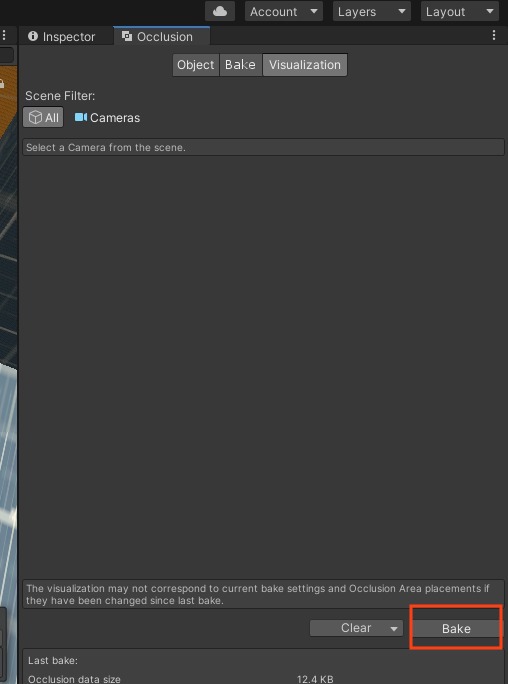
Save the scene again.
Extra - StabableObj#
Want some items to be stabbable (and also climbable)? You can do this as followed:
- Find the object you want to be stabbable/climbable.
- Give it a
RigidBodycomponent and mark itIs Kinematic.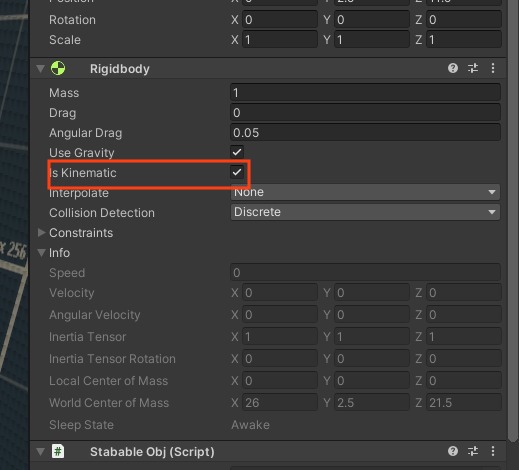
- Give it a
StabableObjcomponent.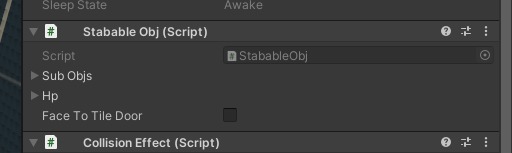
Extra - Combat Room#
- Want to know how to create a Combat Room? Please read Create Combat Room.
Phase 2: Prepare to export your mod#
You cannot use the icon generator on a Scene. So we will manually have to add a song icon.
Manually adding an icon
- Open the newly created
IConfolder and drag your.pngfile in there. - Click the image file, and make sure the setting:
read/write enabledis enabled - Click the image file, and make sure size is set to 256px:
read/write enabledis enabled - Set the Max size to `256` and click `Apply` to save (yes screenshot shows 128, my bad).
Phase 3: Build the mod#
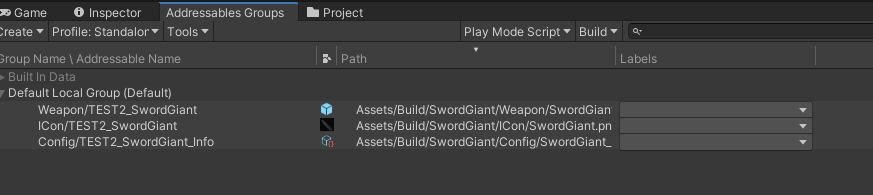
1. Update all addressables.#
- Go to AddressableConfig(
Assets > Resources > AddressableConfig) or use shortcut:ctrl+shift+e. - Click
Clear AddressablesandCreate And Refresh Addressable Name.
Then you will see this tool has already setup addressable path for you in the Addressables Groups window. (Window/Asset Management/Addressables/Groups to open this window)
3. Build#
Click BuildTools > BuildAllBundles to Build.

Once you build it successfully, then you will find your mod in the Assets/Mods. If something errors, please checkout the Console information, unity will tell you what's going wrong. And feel free to ask questions on our discord server.

Phase 4: Test & publish the mod#
1. Install on device#
For PC (Recommend for debugging):
- Make sure you have Battle Talent installed (Steam).
- In Unity: Click
BuildTools>InstallModOnWindows.
For Quest:
- Make sure you have Battle Talent installed on your Quest (Quest store).
- Make sure you've connected your headset correctly.
- Make sure you've allowed sideloading.(if you are not sure how to do this, you can follow this tutorial: https://www.youtube.com/watch?v=RoIXxIfRNTw)
- In Unity: Click
BuildTools>InstallModOnAndroid.

2. Spot the issues via log panel#
Now that it's installed it's time to see if it's working correctly. See if the console gives you some errors. It'll be opened when you toggle Cheat Menu on.

3. Upload your mod to mod.io#
- Zip your mod.
- Go to https://battletalent.mod.io/.
- Click
Add mod. - Authenticate (login).
- Fill in the required fields.