Basic - Create an avatar mod
Here is a step to make a simple avatar mod.
Phase 1: Define your mod
1. New mod project
Make sure you have the prerequirements for modding and download a fresh ModToolkit to start.
- Download & Install Unity Hub.
- Download & Install Unity (2020.3.48f).
- Download the Battle Talent ModToolkit. (Wanna use git? Check out the repo!)
- Open the downloaded ModToolkit in Unity.
2. Remove unused content
Make sure to remove the demo content so that we have a clean project to start with.
- In the Unity toolbar; click
Tools > Destructive > Cleanup All Content.
3. Product name
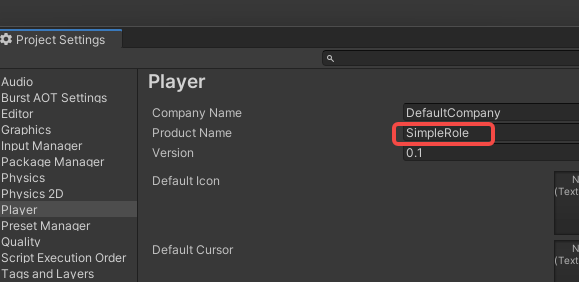
Change the product name so that the mod folder name will not conflict with other mods.
- In the Unity Toolbar: Go to
Edit -> Project Settings -> Player. - Modify field
Product Nameto your new mod name. Use the format:YOURPREFIX_MyModName. Example:WMD_ChevalierWeapons
4. Prefix.
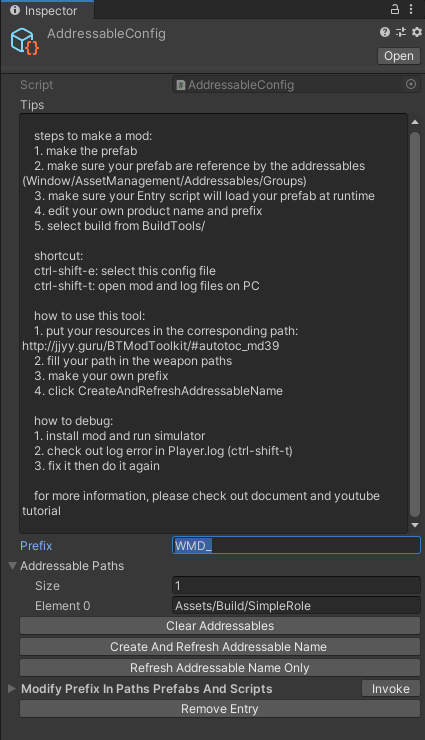
Change the project prefix so that the mod files will not conflict with other mods.
-
In the Unity file browser: Open
Assets -> Resources -> AddressableConfig.asset -
Modify field
Prefixto your new prefix name. Use the format:YOURPREFIX_MyModName_. Example:WMD_ChevalierWeapons_Note: The prefix used in the tutorial is
WMD_. You will need to fill in your new prefix instead of everyWMD_in the tutorial.
5.Generate folder structure using the template wizard.
- In the Unity Toolbar: Go to
Tools → Template Wizard. - Make sure the
inspectorwindow is shown (Template Wizard will show there). - Enter a
new mod folder name. Example:YourModName - Set the
Mod Typeto:Avatar. - Fill in the desired
ItemInfoConfigfields. - Click the
Generate Templatebutton to generate theAvatarfolder structure.
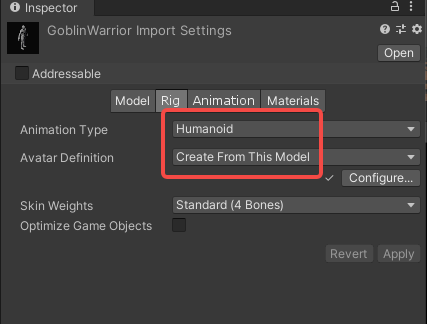
6.Set the Animation Type to humanoid and Avatar Definition to Create From This Model
- Add your custom model to your
Resourcesfolder in Unity. - Change the following settings on the model like the image and click apply.
7.Configure the model into the prefab
- Open the newly created prefab in the
Avatarfolder. - Drag your model into it the hierarchy.
- Navigate to the highest object (should be the same as the name of your mod) so that you see component
RuntimeAvatarBuilder.
![]()
- Drag your model object into the
fbx prefabvariable.

- Click
Auto Config Builderbutton.

8.Slots configuration
The weapon and spell slots of an avatar need to be positioned. The positioning tools have been initialized by clicking the auto config builder button that help you position your slots on the avatar.
- Click the
Hand Slot Leftfield to navigate to that transform.
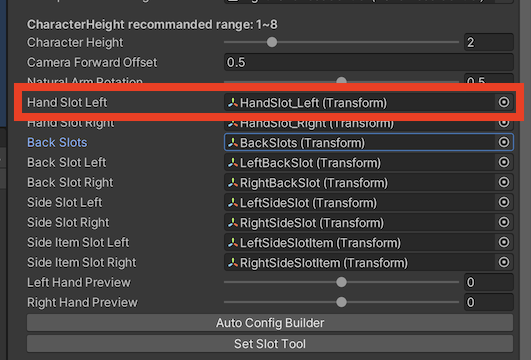
- Reposition the hand slot transform to be on top of your hand.
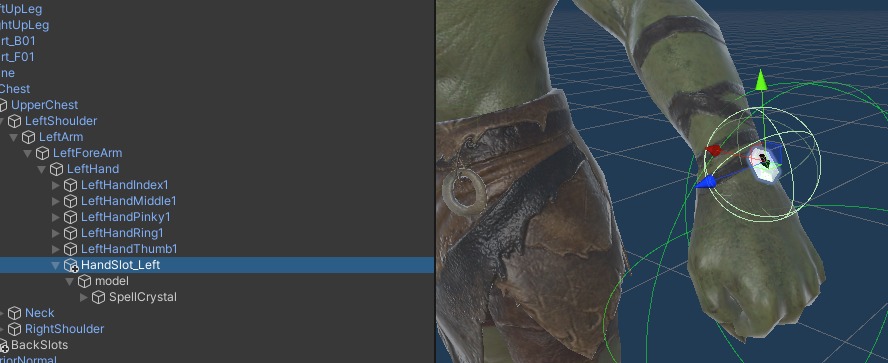
- Click the
Hand Slot Rightfield to navigate to that transform.
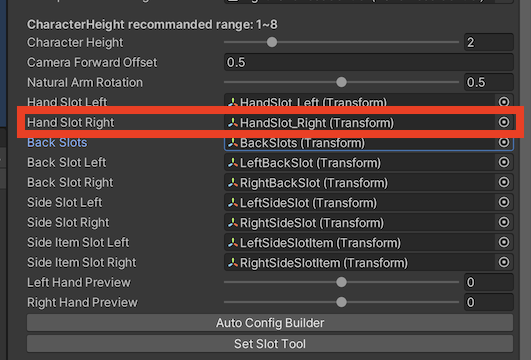
- Reposition the hand slot transform to be on top of your hand.
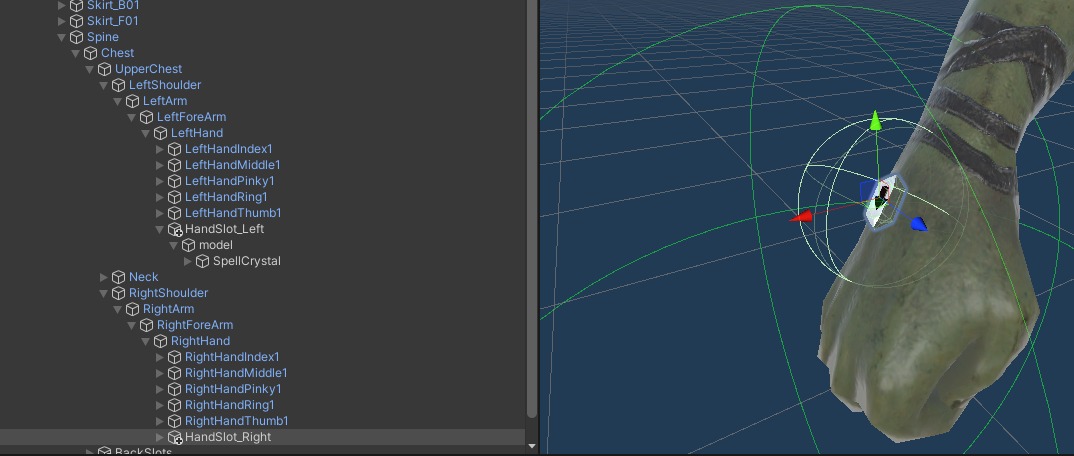
- Click the
Back Slotsfield to navigate to that transform.
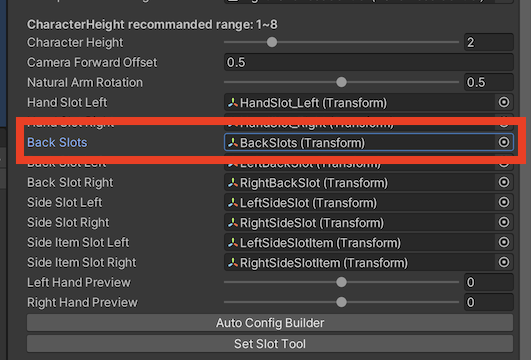
- Reposition the back slot transform to be on your back.
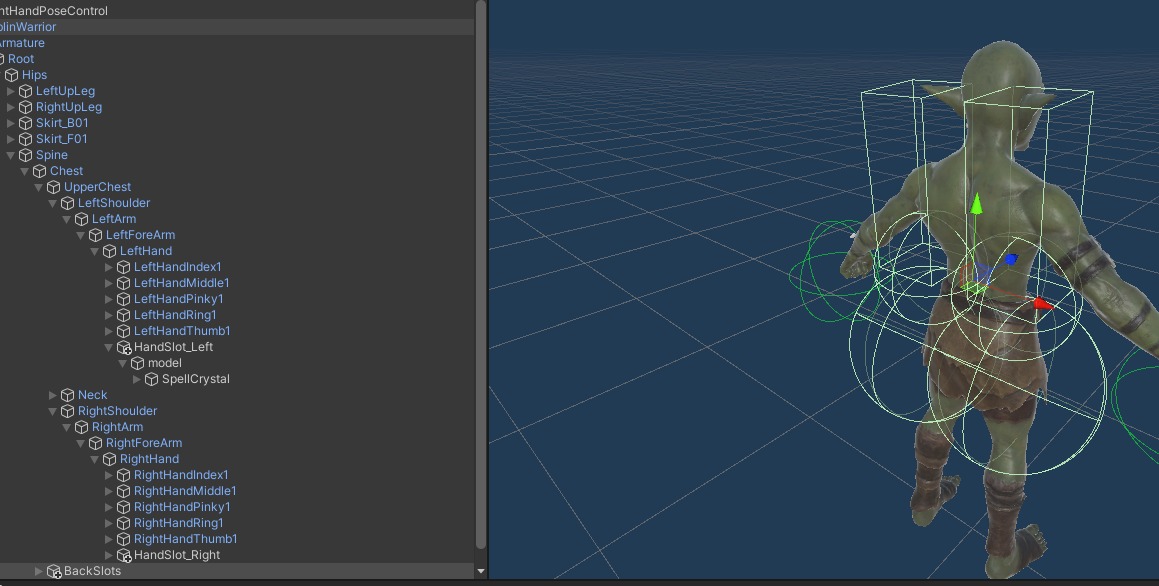
- Click
Set Slot Toolbutton to apply the new positions & rotations.

9.Finger configuration
-
Open the
Avatarprefab. -
Navigate to the highest object (should be the same as the name of your mod) so that you see component
RuntimeAvatarBuilder. -
Click
HandPose Control Leftto the left handpose component.
For avatar, you will manually need to set the hand poses. Do that like so:
- Invoke the
Auto Config Fingers. with the number of ** gameobjects in a finger** (usually 3 or 4).
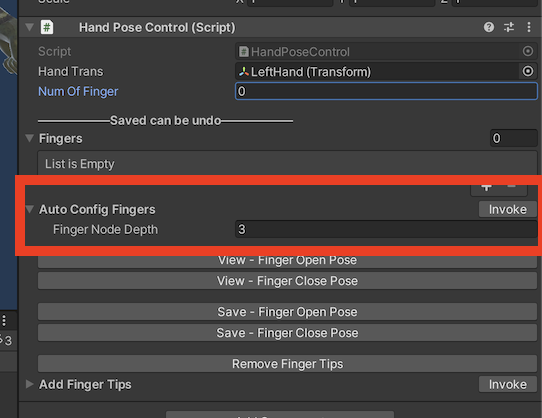
- Go back to the
RuntimeAvatarBuildercomponent. - Adjust the
Left hand previewslider to the left & click thePreview hand posebutton.
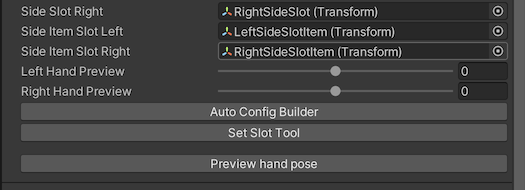
- The hand should now be closed. Open the
HandPoseControlLeftcomponent and clickSave - Fingers Close Pose.
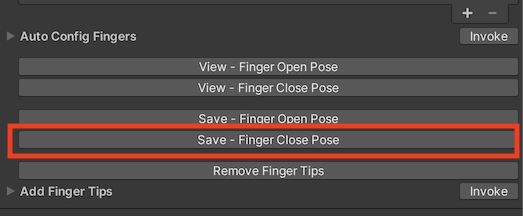
- Go back to the
RuntimeAvatarBuildercomponent. - Adjust the
Left hand previewslider to the right & click thePreview hand posebutton. - The hand should now be closed. Open the
HandPoseControlLeftcomponent and clickSave - Fingers Open Pose.
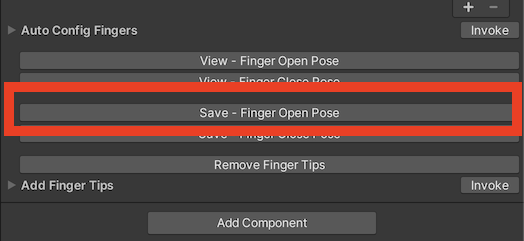
- Test if grips are ok by clicking
View - Fingers Close Pose&View - fingers Open Pose.
Great, you just did the left hand.
- Go back to the
RuntimeAvatarBuildercomponent and do the same for the right hand. - Save the prefab.
10.Handpose configuration
If you find that some of the hand poses are offset after packing and using them in the game, you can set the avatar's exclusive HandPose by following these steps.
-
Open the config file in
Assets > build > YourModName > Config. Under the SetDefaultPoseValueToAvatar field, fill in the AvatarName and the name of the HandPose you want to override.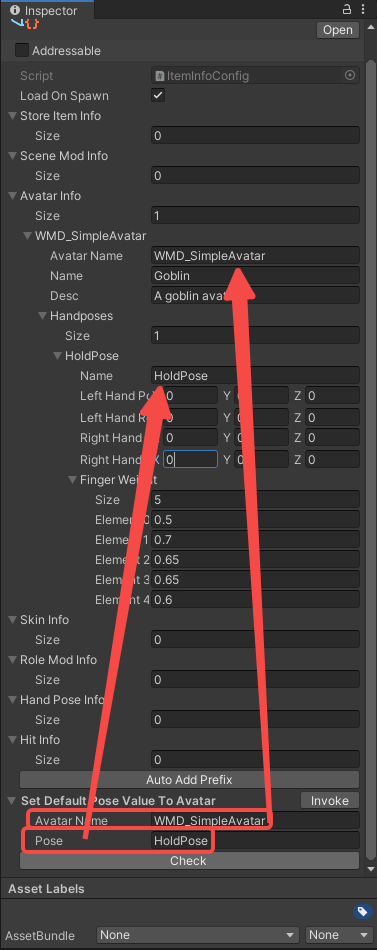
-
Click on Invoke. The corresponding HandPose data will be filled in automatically.
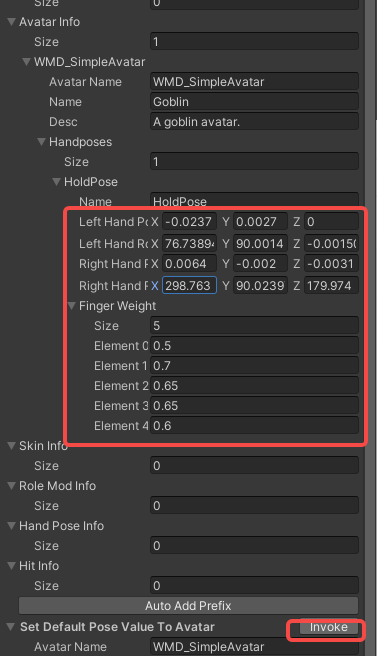
-
Adjust the data to suit your needs, the adjustment will only affect the hand pose of this avatar in the game. Please check Modify Avatar HandPose
11.FAQ
Q: The model's face is visible in front of the camera. Anything I could do about that?
A: Yes! You could give the face mesh the layer: InvisibleFPS to fix this problem. If the model does not have a separate mesh for the head (which is usually the case), then you can follow this tutorial to cut of the models head in Blender.
Q: My controllers control the wrong fingers. What's up with that? A: Using "auto config" on the fingers requires the fingers to be in a specific order. Use the following to always have correct controls:
- thumb
- index
- middle
- ring
- pinky
Phase 2: Prepare to export your mod
Create Configuration files and fill (AvatarInfo)
Generating the icon
- In the Unity Toolbar: Go to
Tools → Icon Generator. - Drag the
Prefabof your mod (the weapon, avatar, scene) into the field:Game Object To Render. - Adjust the settings of the icon to your liking.
- Click the
Save PNG...button. - Overwrite the dummy icon in folder
IConof your mod that has been created for you previously. (keep the name as is. Don't change this). - Set the Max size to
256and clickApplyto save (yes screenshot shows 128, my bad).
Phase 3: Build the mod
1. Update all addressables.
- Go to AddressableConfig(
Assets > Resources > AddressableConfig) or use shortcut:ctrl+shift+e. - Click
Clear AddressablesandCreate And Refresh Addressable Name.
Then you will see this tool has already setup addressable path for you in the Addressables Groups window. (Window/Asset Management/Addressables/Groups to open this window)

3. Build
Click BuildTools > BuildAllBundles to Build.
Once you build it successfully, then you will find your mod in the Assets/Mods. If something errors, please checkout the Console information, unity will tell you what's going wrong. And feel free to ask questions on our discord server.
Phase 4: Test & publish the mod
1. Install on device
For PC (Recommend for debugging):
- Make sure you have Battle Talent installed (Steam).
- In Unity: Click
BuildTools>InstallModOnWindows.
For Quest:
- Make sure you have Battle Talent installed on your Quest (Quest store).
- Make sure you've connected your headset correctly.
- Make sure you've allowed sideloading.(if you are not sure how to do this, you can follow this tutorial: https://www.youtube.com/watch?v=RoIXxIfRNTw)
- In Unity: Click
BuildTools>InstallModOnAndroid.
2. Spot the issues via log panel
Now that it's installed it's time to see if it's working correctly. See if the console gives you some errors. It'll be opened when you toggle Cheat Menu on.
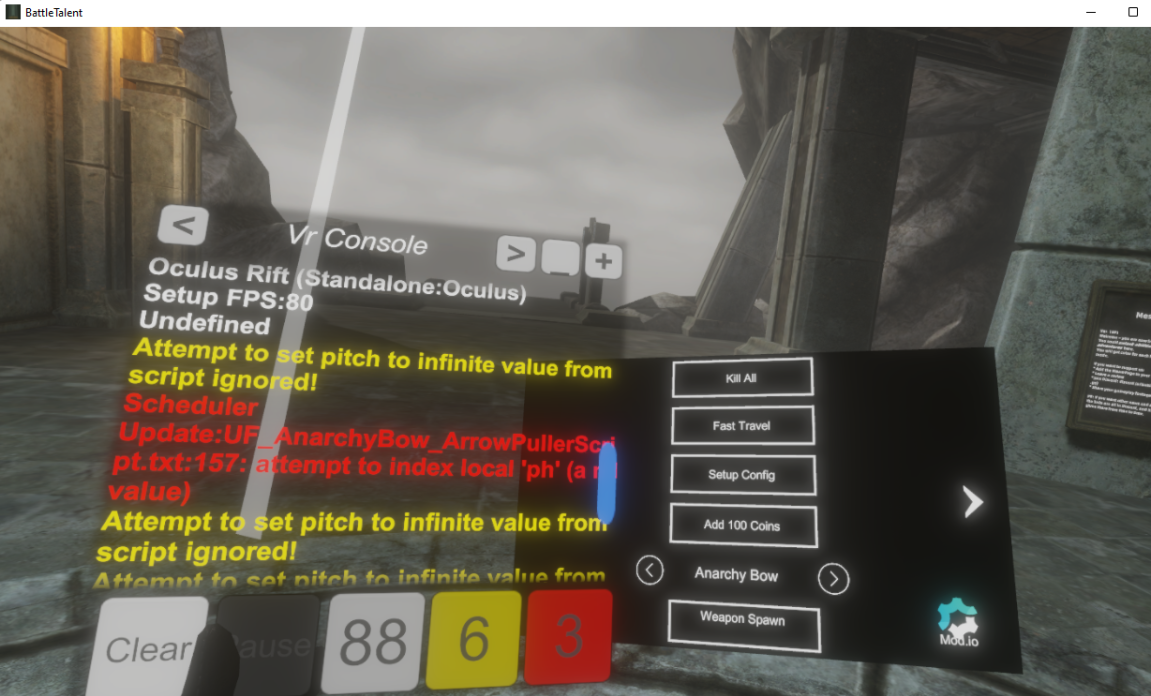
3. Upload your mod to mod.io
- Zip your mod.
- Go to https://battletalent.mod.io/.
- Click
Add mod. - Authenticate (login).
- Fill in the required fields.